

Livestock & Utility Shelter 6m x 6m x 3.7m
Protect your livestock with this heavy-duty shelter.
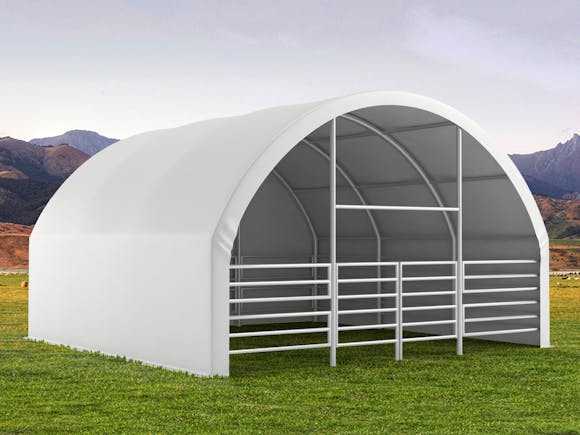
Product overview
Protect your livestock with this heavy-duty shelter.
Its tough galvanised steel frame and 610gsm U.V stabilised PVC cover make it the perfect shelter for calving season, sheltering livestock or pets when the weather turns rough.
The included gates keep all the animals where they should be and they are simple to remove when not required. Thanks to the straightforward design, this shelter is easy to put up and take down as you need it.
Backed by our 5 Year Warranty, it’s a great investment in the wellbeing of your valuable livestock or pets.
Perfect for horses, sheep, cows, pigs, goats, alpacas or any other animals you have running about, you can also use it as a temporary carport or storage area. Order yours today.
FEATURES
• Galvanised steel frame
• Removable gates
• 610gsm UV stabilised PVC cover
• Waterproof and fire resistant
• No interior wires or bracing for maximum space
• Easy to install and relocate
• 5 Year Trade Tested Warranty
SPECIFICATIONS
Dimensions: L 6m x W 6m x H 3.7m
Floor Area: 36m² (approx)
Frame construction: Ø60*1.5mm hot-dip galvanised steel tube, Ø38*1.5mm hot-dip galvanised steel tube
Roof material: 610gsm UV stabilised PVC
Packaged dimensions: 224cm x 122cm x 67cm
Weight: 361.8kg
Can we help?
Our friendly and knowledgeable gurus are trained to answer all your questions as quickly as possible. So if there’s anything you need to know just give us a call during business hours, or send us an email any time.
Questions and answers
Reviews (10)
Customer photos
Overall rating
- 5 star60%
- 4 star30%
- 3 star0%
- 2 star10%
- 1 star0%
Read reviews that mention
Overall happy with product, a couple complaints. instructions are a waste of time. I wouldn’t take much time to print some new instructions. the round disc anchors don’t work either we used full length waratas hammered right in for anchors
Fantastic product, we are using as a carport in front of our existing garage, has already been through heavy rain and huge winds with absolutely no issues at all. We are very happy customers
I was so pleased with the first shelter that I bought a second shelter and attached both of them end to end. Everything went well. First I built a timber border around the perimeter to mount the shelter. I used 200 x 50 H4 timber and a few 100 x 100 post-stubs as hold-downs. Then I mounted the shelter on top of the perimeter border. After laying the timber border - the first shelter took 8 hours and the second shelter took 6 hours. I also laid some filter cloth and then base course and then some pavers.
Steel Frame and Cover of excellent quality. Instructions for assembly would be difficult for persons with limited practical skills to follow. Illustrations poor are poor and sometimes misleading, I ditched them. Ratchet tie downs are poor quality/ poorly stitched together. 90% of them broke whilst tensioning cover. The product overall is good, but let down by poor or cheap components. Our intended purpose for this shed is for rearing calves, so is fit for purpose in that regard.
Better than anticipated
The shelter was of fairly good quality, although not simple to construct. The unit came with completely inadequate tie downs and anchors
Put this shelter up to be used to cover to work truck, was easy to build in 6 hrs with 5 men on concrete base
My son has grown out of his single bed cupboard of a bedroom. So we're converting the internal garage into his new bedroom. However we need to remove all the junk from the garage before he can move in. We looked at building a new external garage or substantial permanent carport. But found that I needed to sink pilings, obtain an engineering report and get building consent. All way too expensive! So we started looking for temporary strictures to get around the building consent process and discovered the stock shelter. It is big! Very big! I didn't appreciate how big until it was erected. The height, at just under 4 meters, is the most surprising aspect. It arrived in a large palitised cardboard box, well wrapped and undamaged. Five of us (3 adults, 2 children) erected it in a day and a half. We started by constructing the 4 main hoops then stood them upright and bolted the side longitudinal braces to make it a free standing structure. Not having high enough ladders we unbolted and removed one side wall so that we could lower the top of the structure down to add the final top longitudinal braces. Then we lifted it back up and reattached the sidewall. There are a lot of nuts and bolts that need to be tightened. I used an electric drill with a socket, which was invaluable. Some of the instructions on where to put which bolts were incorrect. I found, the main tarpaulin a nightmare to put on. We tied ropes to the two end tie downs and tried to pull it over the structure from one side to the other. Not a good idea too much weight and too much friction to easily pull it over. But we got there eventually. Perhaps if I had laid the tarpaulin over the frame when I had the side wall off it would have been easier. But I was concerned that I would not have been able to lift the combination weight to refit the side wall. Tensioning it is a concern, it is tight over the hoops but not on the rest of the frame. The end wall was easy , I started by securing it half way up then securing a bit on each side until I reached the top. Then secured the bottom half. A video demonstrating how best to construct the frame and put the tarpaulin on, also how to correctly tension would be my recommendation. The kit comes with 4 ground screws which, in our sandy ground, was easy to install. We have placed one side of the structure on top of a retaining wall and bolted it to that so we have all 4 ground screws holding the other side wall to the ground. Just as well to as a few days after its erection we had 120 km hour winds. The shelter came through fine but two things stood out. It's noisy in the wind! The metal bolted parts move against each other, creating quite a racket in the wind. Something to be considered if you're building it right next door to a bedroom like we have. Perhaps small bits of felt could be supplied to put between each metal joint to alleviate the problem. The other thing is that we chose not to erect the front gates so that left it a slightly structurally weakened. I purchased some ratchet tie downs and secured them in a diagonal fashion across the top of the front which has stiffened the entire structure and fix that problem. Overall very happy with the shelter and highly recommend it. Here is a link to some pictures. https://photos.app.goo.gl/bzzTcmLvNdQFJNM98 Cheers Brent
The instructions for installing the metal frame are adequate, there is some interpretation required. The instructions for installing the rear and cover are minimal at best. There is a lot of trial and error involved. The ground anchors are a nice idea, however posts do a better job in our soil. It is amazingly cool within the shelter once it is erected. It took 3 people a full-day to install this shed.
Genially happy with product. Could possible improve the durability of the end cover connecting ties
Locations
Our Auckland Store and Christchurch Showroom are open Monday to Saturday.
- Auckland Store
- 80 Kahakaha Lane
- Māngere
- Auckland 2022
- Christchurch Showroom
- 9 Commerce Crescent
- Islington
- Christchurch 8042

Payment
All prices are in NZD and include GST. We accept Visa, Mastercard, American Express, Apple Pay, Google Pay, bank transfer, Paypal and Afterpay. Credit card payments are fully secure. Payment methods.
Shipping
We use CourierPost, Fliway Transport, Team Global Express and Auckland Metro Freight. Shipping prices are shown on product pages and in the checkout.
Warranty & Returns
We offer a limited Return Policy and minimum 12 month Warranty on all products.