

Louvre Roof System 6m x 3m White
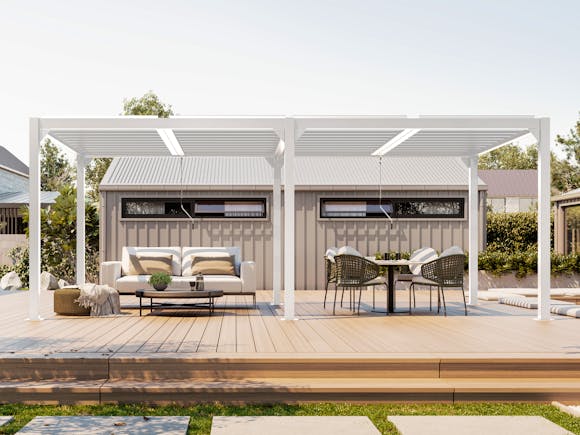
Create the stunning, multi-use outdoor area you’ve always wanted with this sleek, architectural louvre roof.
Frequently bought together

Product overview
Create the stunning, multi-use outdoor area you’ve always wanted with this sleek, architectural louvre roof.
The integrated crank system allows you to easily and smoothly open or adjust the louvres. Open it right up and enjoy that perfect Kiwi summers day or keep it closed when the weather is changeable - the integrated gutters and internal downpipes make this roof system truly all-weather.
The sleek white powder coat finish and contemporary style blends well with most outdoor areas, while the straightforward instructions make this a great DIY upgrade. The built-in gutters feature hidden outlets through the foot of each pole, letting the water disperse without the need for ugly pipework everywhere.
With its strong aluminium frame, louvres and galvanised fittings this roof system is built to last, while being easy to clean and maintain.
Each bank of louvres is operated by a separate gear crank system, so you really can tailor the shade to your needs. Keep one half cool and shady, then open the other side to vent the BBQ.
This amazing value free-standing system is the ideal way to add some architectural style to decks, patios, pool areas or any other area that you want to transform into a stunning outdoor living room.
☆ Note on accessory compatibility: Blinds are compatible with existing 6x4m and 6x3m Louvre Roof Systems on all sides and shutters panels can be positioned anywhere as both these models feature centrally mounted cranks. Both accessories replace the corner bracket during installation. For 3m sides (2.7m post to post), use a single 2.7m blind or up to three 0.9m shutters. Treat 6m long sides as 2 x 3m sides for blinds & shutters. See images above for more details.
FEATURES
• Free-standing 6m x 3m louvre roof system perfect for larger areas
• Create your ideal all-weather outdoor living space
• Twin, adjustable louvre banks
• Fully-integrated gutter system with internal downpipes
• Gear crank system for infinite adjustment
• Rust-proof powder coated aluminium construction
• Crisp white finish & architectural style looks amazing anywhere
• Straightforward DIY assembly
• Centre crank model
• 5 Year Trade Tested Warranty
SPECIFICATIONS
Total dimensions: W 5.780m x D 2.966m x H 2.3m
Frame material: Aluminium, 2.0mm (beam) / 1.6mm (post)
Louvre panel material: Aluminium, 1.4mm
Top beam dimensions (each): W 45mm (horizontal) x H 120mm (vertical)
Colour: White powder coat
Post dimensions: 230cm x 10cm x 10cm
Louvre dimensions: L 135.4cm x W 14.5cm
Ground plate dimensions: 16cm x 16cm
Weight net/gross: 213.4/241.3kg
Carton dimensions: Carton 1 – 263cm x 36cm x 26cm, 41kg. Carton 2 – 289cm x 25cm x 19cm, 32kg. Carton 3 - 289cm x 30cm x 29 cm, 53.3kg. Carton 4 - 289cm x 20cm x 19 cm, 19kg. Carton 5 - 146cm x 38cm x 34 cm, 48kg. Carton 6 - 146cm x 38cm x 34 cm, 48kg.
Can we help?
Our friendly and knowledgeable gurus are trained to answer all your questions as quickly as possible. So if there’s anything you need to know just give us a call during business hours, or send us an email any time.
Questions and answers
Reviews (63)
Customer photos
Overall rating
- 5 star85%
- 4 star13%
- 3 star2%
- 2 star0%
- 1 star0%
Read reviews that mention
- completely transformed
A well made beautiful louvre roof system. Has made such a difference to our " cottage" .We now have somewhere to sit under and also protection for our car.
Did our research and decided to go with Trade Tested. Firstly the packaging was outstanding. To think that these large heavy cartons came from China and then from AK to Motueka with no damage whatsoever. Then the opening, which is the best part. Each part was individually wrapped and the black powder coating was extremely well done. The assembly took 4 hours with 3 people (6*3m). The instructions were clear except for the Louvre's. Checked YouTube and saw how it was done. Overall, great product.
Shared from: Louvre Roof System 6m x 3m Charcoal
Best on the market! We were lucky enough to purchase this on sale however, we had our eye on it for some time. We have loved it and have had so many compliments on it. Took my husband and his friend about 5 hours to put up. Definitely recommend!
Shared from: Louvre Roof System 6m x 3m Charcoal
Great quality, easy to assemble (just need a few pairs of hands) and looks great!
Shared from: Louvre Roof System 6m x 3m Charcoal
All superb quality.
Shared from: Louvre Roof System 6m x 3m Charcoal
No problems good quality so far. Happy to recommend this to anyone. Louvred a bit of a faff to install initially but once you have done a couple it becomes simple.
This product well exceeded expectations - 2 short 6 hr days to install for one person (incl trips to Bunnings) with just an hour of help from a second person. Like to share some tips. Firstly shoutout to the chap who posted his construction of one of these on youtube. Some of his tips were useful and helped guide the modified assembly approach I took in the end. In no particular order: 1. The packaging quality is awesome - arrived in very good condition - so well padded internally that you can safely use a boxcutter with short blade without worrying about damaging anything inside. 2. The included A5 size instruction book is way too small to read - download the soft copy from website and try and get it printed at least A4 side but I did A3 colour which is even better. 3. Take care with all the fasteners - I found there was exactly enough, no more no less. The only items where there was more than enough was the silicon and the plastic plugs. 3A. The screws are stainless and you are screwing into aluminium - so be very careful not to crossthread - as you will wreck the hole. I chose to use a good allen key for all the screws - for better control (some holes can only be done with allen key - a battery unit cant reach). 4. I had a nice concrete pad to fix pergola to - so I agreed with the Youtube guy - that the supplied screws and plugs are a bit weak - and went out and bought masonry screw anchors instead - ANKA 8x60 about $40 for the 24 that I needed. I have a feeling I chose a larger diameter - because I wanted to have my pergola as well secured as possible. If you chose 8mm screw anchors - the thread diameter is 10mm and only just fits the 11mm holes in the post plates .. this means you need to be accurate in your drilling and post placement. With careful setup I had no probs with the larger screws. 5. Note with 8 mm screw anchors you use 8mm masonry drills. 6. Expect the screws to be tight and challenging to screw into the concrete - get yourself a good socket wrench with the longest handle you can manage (the holes are close to the post so using a battery driver to do up the screws is not practocable esp near the end). 7. Get yourself a long masonry drill - one that can drill right through into soil below (assuming your pad is 80 - 100 mm thick. This saves you trying to get debris out of a blind hole - the screw anchors do not like debris in hole. Also the long drill (I had 150mm) allows you to use the battery drill to open out any slightly misaligned holes - after the posts are placed in position (helps keep drill away from post) - however it is important that you drill the holes with posts not in place - as that is the only way to get a nice vertical hole. 8. When marking the holes (with the posts in place) I use an old masonry drill as a centre punch. Using a marker pen is hopeless as it is soon obscured and also when you start drilling it is hard to stay on right spot. Just a mm or two off and you will have a hell of a job later. 9. Take lots of care with checking the post placement - it will help to have a spirit level - because if everything is bolted up correctly - having vertical posts speeds up getting the post positions even at ground level. I measured every inter-post dimension to make sure they are even (the leaflet unfortunately does not give you the measurements - so trial and error needed). 10. If the dimensions are spot on - the louvres and everything else fits like a glove. The leaflet mentions using a screw driver to lightly forcxe things if louvres dont line up with holes. I did not have to do this even once. 11. I did the job 90% by myself and only needed a helper to join the two halves to the centre posts. (this may be harder if this was the 6x4m). 12. The assembled 6 posts and outside rails (no centrebeams fitted)* is easy enough to creep around into the right final position even by on person. Pre-planning when you do the assembling will help as you will want to stand everything up as close as possible to the desired position. 13. I applied the silicon at a much later stage than stated in the manual... basically only after the whole assembly was bolted down in final position. It seem to me that all the movement would disturb the seal if applied too early. 14. The manual is vague on where the sealant goes - but just study the joints and you will see how the water runs. There are some important horizontal joins (1mm or less) that you must seal. You will know you got it right when you can see the small bits of silicon from underneath when standing under the joints. I only used half a tube - I am stumped as to why they gave us 2 tubes. 15. I also installed all the centre beams after the frame was in final position - this makes it the whole thing easier to move around into final postion - less weight...plus gives you more flexibility postioning the posts correctly relative to each other. If you get this right - you have nothing to fear about the middle beams not fitting - I found all the holes lined up beautifully. 16. The louvres are quite fiddly to begin with - and the youtube video didnt help. The key here is that when you have it correctly positioned - it goes in easily .. if you are doing anything forceful - that should ring alarm bells - you have got it wrong. There is one small tap with the palm of the hand needed to clip the louvres in at the end though. That last bit is the key - always check on every one - there is a tongue at rail holder at both ends that has to be end up in the groove that runs the length of the louvre. "Make it click". I also postion the lovres at 45 deg to make it easy to put the plastic plugs in . At that angle I can put the plug in from top whilst also view everything from underside. Also I found it easier to do this well before dusk - as the ironsand coloured parts makes it hard to see the finer details. 17. My install was similar to the youtube one - except that I was able to slip mine a little under the eaves so I dont get rain between the perogola and house. Also I didnt like having the handles postioned further from the house - so make sure when you do the first layout of posts and rails that you orient it to put the handles on the side that you prefer. Mine are closer to my ranchslider for quicker access. 18. Lastly when shopping around I did take into account the pergola height. Other brands the more expensive ones especially are taller - and that might be what you want - but to me it was a disavantage to get one that was the same height as my eaves - as then I can only butt it up or have a gap. The much taller ones also have the disavantage of being harder to assemble. This TT one was a dream to work on just off a normal stepladder. PS. I should have said 3 days - you do need to set aside another day to deal with all the cardboard and packaging LOL. It was probably 1/3rd of the time spent in the end and will take me at least 3 rounds of recycle bin pickups to get through.
Shared from: Louvre Roof System 6m x 3m Charcoal
Purchased the louvre roof and 2 back curtains, very happy with this Purchase, didn't take to long to assemble, real game changer for around the pool.
Shared from: Louvre Roof System 6m x 3m Charcoal
Delivered on Friday afternoon and we started at about 8.30 am, fully assembled including one blind within about 4 hours. Super happy with it! Looks great
Good quality, great products, withstands high winds and specifically customised for our place by JVD Projects.
Shared from: Louvre Roof System 6m x 3m Charcoal
Locations
Our Auckland Store and Christchurch Showroom are open Monday to Saturday.
- Auckland Store
- 80 Kahakaha Lane
- Māngere
- Auckland 2022
- Christchurch Showroom
- 9 Commerce Crescent
- Islington
- Christchurch 8042

Payment
All prices are in NZD and include GST. We accept Visa, Mastercard, American Express, Apple Pay, Google Pay, bank transfer, Paypal and Afterpay. Credit card payments are fully secure. Payment methods.
Shipping
We use CourierPost, Fliway Transport, Team Global Express and Auckland Metro Freight. Shipping prices are shown on product pages and in the checkout.
Warranty & Returns
We offer a limited Return Policy and minimum 12 month Warranty on all products.